Showing posts with label Tools and materials. Show all posts

Unique small stud earrings, a problem solved.

Over the past few years I have been asked on many occasions for smaller stud earrings than that of what I already make.
I haven't got around to doing this until the other day when a young girl came into the studio and really loved my jewellery but wanted something smaller to wear at school. I asked, can you give me about half an hour and I will see what I can come up with.
After scratching my head again (ooops that's a bit more on the hair loss lol). I got out the required coloured glass, cutting board and gas torch. I found that a 1/4" square of 3mm dichroic melted into a nice round shape.
And here is the finished pair, quite nice if I say so myself and the customer was over the moon with them. And all for a fiver!
Anyway back to the problem solving.
This weekend I decided to do some more of these small stud earrings, as I had just bought some special small posts for them (that's another story).  The first step was to cut quite a few 1/4" square diachroic glass pieces in different colours and set them on the firing tile along with a repair job on some devitrified bracelet cabochons I had made last week. I will have a chat about devitrification at some other point but most glass workers know about it. Set the kiln going and waited for the heating cycle to finish.
This was my view, well at least it warmed the studio up......
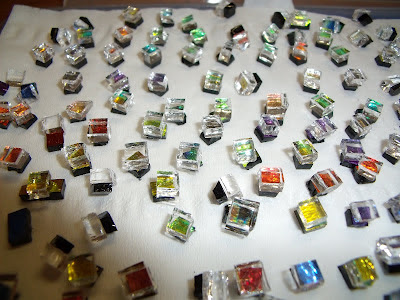
As you can see, small cabochons at the front and the large bracelet cabochons at the back. When these had annealed and cooled it was time for gluing the posts on. 
I normally glue and then stand dichroic side down until dry but with these they kept falling over. So, after some more head scratching. I came up with a very quick and easy solution (to me anyway). A tray of sand to sit the small dichroic glass stud earring on there head in. Here's another picture to show you what I mean
As you can see, all lined up with the posts glued on and I wont be able to touch them for at least 48 hours because I use E6000 glue. This glue is amazing but don't even think about touching the glued item for this 48 hours period as it wont be stuck. One issue with this method of drying time storage is DON'T knock or budge the tray, because they will fall over and you will have to spent the next hour or so standing them upright again. If any sand grains get stuck on the glue they should come off once dried (I hope).
Anyway, problem solved, dichroic glass stud earring the would stand up to dry, now sits in a bed of sand to dry. Job done.
Once these have dried I will be listing a few of them on my this blog and my facebook page at 
and eventually on my website:

My way of firing multiple cabochons.

Well you've seen the home made glass cutting tool, the kiln and the finished creations. I thought I should show you how I layer very small, 1/4" pieces of dichroic glass on the kiln tile prior to the firing process. 
But first a bit about the kiln tile. You can see they look a bit pink, and they are. This is the kiln wash or shelf primer, a powder that is mixed with water and then brushed onto the tile. You need a minimum of four coats of this stuff and I usually do about five to six. Over doing some would say but when glass is fired and there is'nt enough kiln wash it sticks to the tile and damages it beyond repair. This pink colour will turn a creamish white after a firing. I usually get about 3 firings before the tiles need sanding down and the kiln wash re-applied.

That's enough of tile preperation for now but I will come back to it in the near future and give you my experiences of Thinfire paper, an alternative.

Now back to what I am posting about.
As you can see, when I do a firing I make sure its worth while. One hundred on the upper tile and about sixty on the lower tile. Fewer on the lower for a couple of reasons. Firstly, there has to be room for a ceramic tile spacer and secondly the lower layer cabochons fire slightly different to the upper layer. 
I don't know if you have noticed in the above picture but not all have a top clear Tekta Glass. About fifty (well fifty one, because there was a gap) small squares or glass are bare upper dichroic with a plain black base glass. This has to be done to get the thickness right. You always have to remember glass wants to be round and about 6mm thick. Keep that in mind when firing and the rest mostly follows. Oh yes, also don't forget glass sometimes just has a mind of its own and does something completely unexpected. Good and Bad!
A lot of these cabochons are ear marked (excuse the pun) for stud earrings. And on that note here is a finished pair of dichroic glass stud earrings set on solid silver posts and solid silver butterfly backs.
You can find these and many more of my jewellery creations at 
www.stevesmithjewellery.co.uk and also by clicking the shop button at the top of this page.
Hope you enjoyed reading my way of making dichroic glass cabochons. I am sure others will have there own ways of doing the same but this works for me.

New glass cutter and unigue gifts

New Glass Cutter and Unique Gifts.
Its great when a plan and idea comes together. For many moons now I have been cutter extremely small squares of glass with a modicum of success. But as the cost of glass keeps going up, the waste amount becomes an issue. It was then that I came across this mosaic cutter. As always, price went from a reasonable amount to an absurd amount. I am sure the extra is for better cutting wheels or something. So for the sake of under sixteen quid I ordered one from Mosaic Trader UK. To see how well they worked or not!

Mosaic glass cutter.
 Within a few days the new tool arrived and I quickly put it to use. WOW!!! What a amazing tool. What used to take me ages, now takes only a few minutes. This cutter is a must for any glass working.
The next picture is of the small squares of glass layered up and put into my Paragon kiln for a quick firing.

Small 1/8" to 1/4" unfired dichroic glass and tekta glass
And here are the small cabochons after firing.
I am alway amazed at the shimmering dazzle that comes out of the kiln. These are so vibrant and are a delight to see.
After firing
And then the finished article. A pair of unique Dichroic Glass stud earrings set on 925 solid silver posts with 925 solid silver butterfly backs. These look absolutely stunning and are all one of a kind.
Close up of finished stud earrings on solid silver posts and butterfly backs.
 As always you can see unique one of a kind dichroic glass jewellery at my website, please click here. On here you will find jewellery to suit all pockets for men and women and prices start at £5 + P&P.

Make your own glass cutting board plus hands free filn wash drier.

Just thought I would share my version of a straight cut glass cutter. I made this from bits n bobs that I found around and the only items I spent money on was a nice white grippy knob, four rubber feet and the cutting head, total cost of about £6.

To start with I got a sturdy chunk of very flat wood, this has to be totally flat for obvious reasons. Then I acquired a short length of steel bar, a "T" union from some pipe job that was done years ago, a old brass ruler, some screws, a couple of nuts and bolts and a bit of Patience.

My apologies for the poor quality of the pictures (man verses technology moment)
but I am sure you get the gist of how it works. This was put together in a day making sure the ruler was the last thing to attach. Make sure that this is totally square with the steel bar and that you have a measurement to both sides of the cutter. This will come invaluable when cutting.

Even though I say so myself, this is the best tool I have or made that cuts a straight line every time. No more, holding a straight edge to cut against. You simply hold the glass against the brass ruler and score by pulling the cutter toward you. Hence why it runs along the steel bar, lift to the edge/start of the score then score. What could be easier..... I do sometimes have some failures but I think that goes with the territory.


Being a man, I am always trying to automate things.

Well my next idea was when I found myself trying to dry the coats of kiln wash on my kiln tile. Whilst helping my partner Sue make a sign for the studio I had to keep turning the dryer off. I found this a bit frustrating as the kiln washes was taking longer that I wanted it to. So, with a couple of small boxes a bit of wood and a spring loaded clip (actually a spare tie clip) the set up was complete.

Except one thing. The tile only dried in one place. A quick head scratch and out came my solar powered turn table for jewellery display. I place the tile on the turn table, thinking I might be too heavy for it but to my surprise it started turning. Excellent.......

With the dryer on full and the tile turning, four coats of kiln wash was dry without me holding it for about 20 minutes.
Here is a picture of my hands free kiln wash drier, unfortunately I did not include the turning table in the picture. Well all inventors have secrets, don't they!!!!!


For safety's sake!!!

Just a quick note about safety for my fellow kiln firing crafters.

It was recently brought to my attention that the orange/red heat view from a open kiln can be very dangerous to the eyes, even at distance. Its called infrared light (IR).

So, I started to have a look on various glass supply site for a set. I nearly fell off my chair when I sore the price, £34 for a pair of safety spec's, there having a laugh.....After another bit of research I found out they are safety glasses that are called flash safety glasses and I found a pair for £8 from Midland-Moto on ebay. A great service and they came with 48 hours and well packaged.

Here are the said glass and then some very strange photo's of me wearing the stylish accessory that all glass crafter should wear.


OOOPS!!!! sorry for putting you though any trauma from looking at these picture but I am always up for a laugh.

What happened next!!!!

Well, here I am again. Its the wee hours of the morning and I have had a full day of kiln firing and setting the cabochons onto findings.

I managed to transport the very small pieces of glass to the studio without many falling over and apart. As you can see by the following pictures.


Then the task was to transfer them to the kiln tile. Not forgetting to add the 4 to 6 layers of kiln wash as I wouldn't want to damage my new tile as they are about 27 quid each. With this done, the tiny bits of glass was neatly placed on the tile ready for firing. As you can see, nicely lined up rows of glass awaiting the transformation to something beautiful. Dichroic cabochons, to attach to solid silver and silver plated findings.


With all that effort and enjoyment of two nights work and a full days work in the studio. The tile was placed in the kiln (extremely carefully) and the door closed. I pressed a few buttons on the program front and my wonderful new Paragon kiln started up and set going on a path to 800 degree centigrade.

Two hours later and the kiln had finished its alchemy and the tile with cabochons was sat on the desk cooling down its final few degrees.

The finished cabochons looked amazing, even though I say so myself. The beautiful Dichroic glass, even such small pieces had changed from skin cutting chunks of silicon to these beautifully round cabochons measuring about 1/8" in diameter. Just what I wanted. I think my partner Sue Simpson of Inspired by Script is getting a bit bored with me shouting "ow my god look how gorgeous these are" oooops sorry Sue. xxx

Here are the extremely small cabochons after the firing process and cooling down.


And this final picture shows a close up image of one of the smallest cabochons I think I have done so far.


I plan for my next post to be about setting the cabochons onto findings, rings and bracelets. Watch this space.

Cutting glass

For my next batch of glass firing I decided to fire some very small pieces. To be precise, 1/8" square glass approximately. These are quite simple designs and have two layers of glass but the time was taken up with cutting. Yes, cutting by hand 284 squares of glass is quite laborious but I am always up for a challenge. Two nights later, they were cut.......and I still have all my fingers and thumbs although my sanity did ebb a bit on a few occasions. Here are a few pictures to give you an idea of what I was doing.


Well as you can see, very small squares of glass. What I didn't think of before cutting them at night at home is transporting them to the studio whilst they are still stacked. I then realised that many months ago I had bought some fusing glass glue. After raking through the grey matter that lies between my ears I remembered where I had put it for safety. Excellent, I then proceeded to glue each pair of square glass together and 2 hours later left them overnight to set/dry.
The next day I lifted one of the pairs up expecting them to stay firm. Well that was a bit optimistic. They separated at the slightest hint of gravity.
So now I have a selection of apparently glue pairs of glass that I have to transport very carefully to the studio. That should be fun. NOT. But I am looking for to starting up my new kiln again.
Hopefully within a couple of days I will have some finished glass pieces that I will photograph and show you what the finished product look like. As, quite often its a surprise to me when all the parts come together to reveal itself as a beautiful piece of jewellery.

My new paragon kiln :o)

Yeayyy!!!!

I have just picked up my new kiln. Its a Paragon SC2-W, that's with a window so I can see how the firing is going without opening the door.

It also came complete with a shelf and four little feet.

I am so looking forward to doing the first firing.

It has a vent hole at the top, just in case I need to vent any built up fumes.


I mentioned earlier about the window, well here it is. In all its clarity glory....


Yet another picture of the front of the Paragon.


Here is the programmable gadgety thingy on the front. I might need a degree to understand how to use these controls. LOL.


Here you can see the shelf kit and the programmable facia.


My kiln....... I am so chuffed, I can retire my 40 year old kiln which has done me really well but this is slightly bigger and hopefully less temperamental.


Hopefully get the first firing done this weekend, ooow what to do first, earrings, pendant, cuff links or bracelets. The choice of colours are endless and the design have been buzzing around my head for ages.

LinkWithin

Related Posts Plugin for WordPress, Blogger...